
Dealing with unwanted emails cluttering your inbox can be really frustrating. From persistent spam to unsolicited newsletters and cold emails, these messages can distract you from important conversations and even pose security risks. In this guide, we’ll show you how to block unwanted emails on Gmail, Outlook, and more, helping you take back control of your inbox.
Understanding Unwanted Emails
Before we dive into the solutions, let’s break down the types of unwanted emails you might encounter:
- Spam Emails: Messages you didn’t ask for, often sent in bulk for advertising purposes.
- Phishing Emails: Malicious attempts to trick you into giving up sensitive information by pretending to be trustworthy sources.
- Cold Emails: Unrequested messages from people or organizations trying to connect with you.
- Newsletters: Subscriptions you may have signed up for but no longer want to receive.
Not only do these unwanted emails waste your time, but they can also expose you to scams and malware. Blocking them is key to keeping your inbox clean and secure.
How to Block Unwanted Emails on Gmail
Gmail offers handy tools to help you block unwanted emails and keep things organized.
Blocking a Sender in Gmail
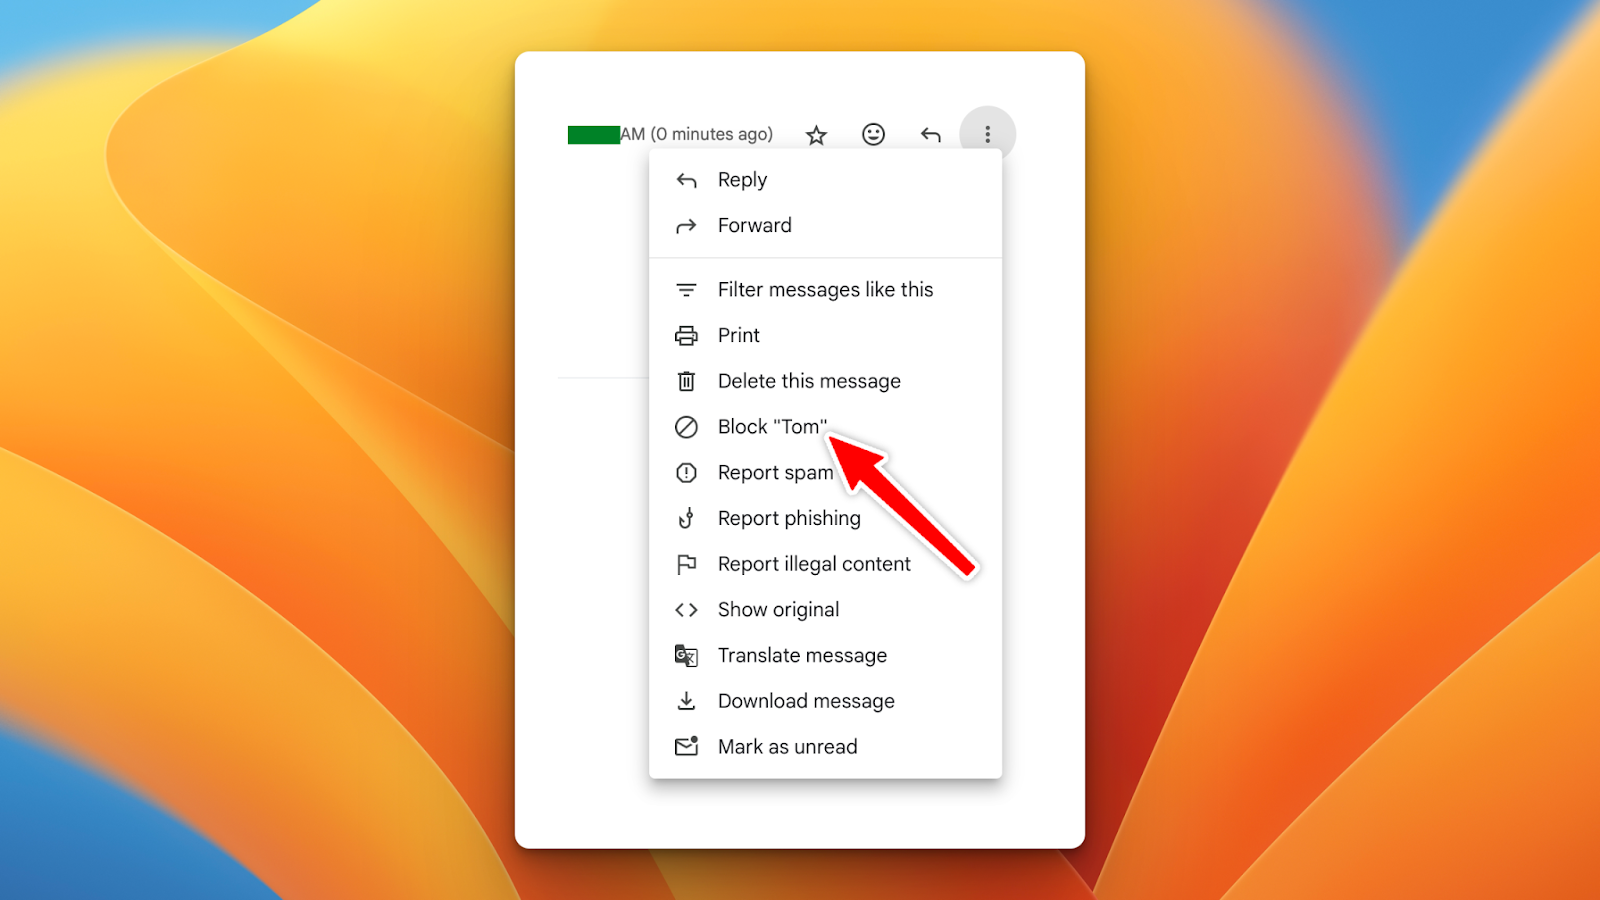
- Open the Email: Find the unwanted email in your Gmail inbox.
- Access More Options: Click the three vertical dots (⋮) in the top-right corner of the email.
- Select “Block [Sender]”: Choose the “Block [Sender]” option from the menu.
- Confirm: A confirmation message will pop up. Click “Block” to confirm.
What Happens Next: Emails from this sender will now go straight to your spam folder.
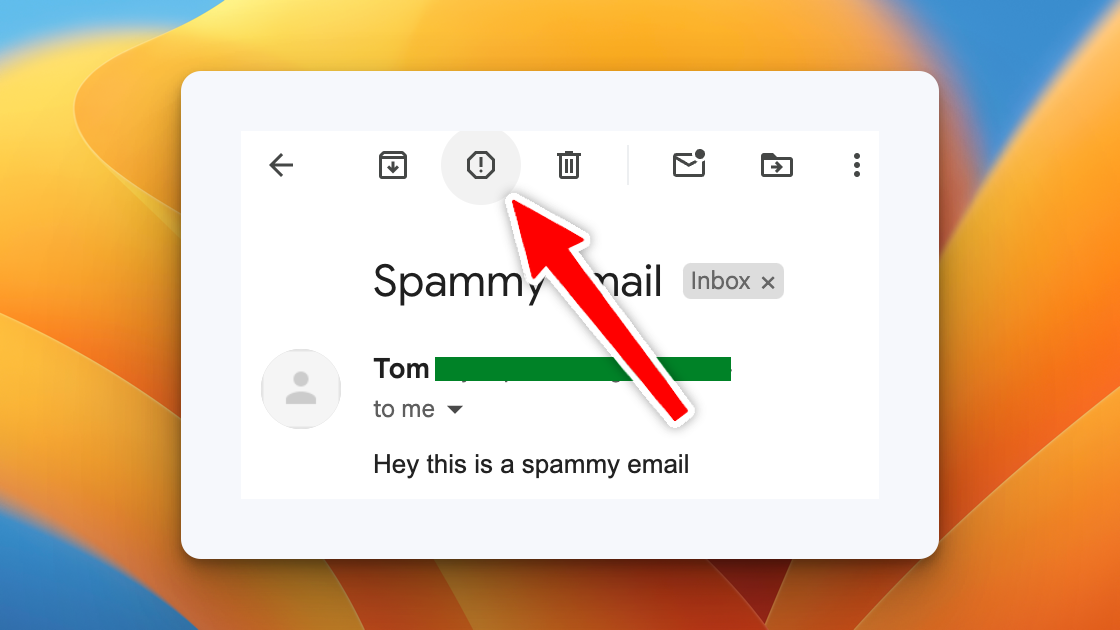
Reporting Spam and Phishing
- Report Spam:
- Open the spam email.
- Click the “Report spam” button (it looks like a stop sign with an exclamation mark) on the toolbar.
- Report Phishing:
- Open the suspicious email.
- Click the three vertical dots (⋮).
- Select “Report phishing” and follow the prompts.
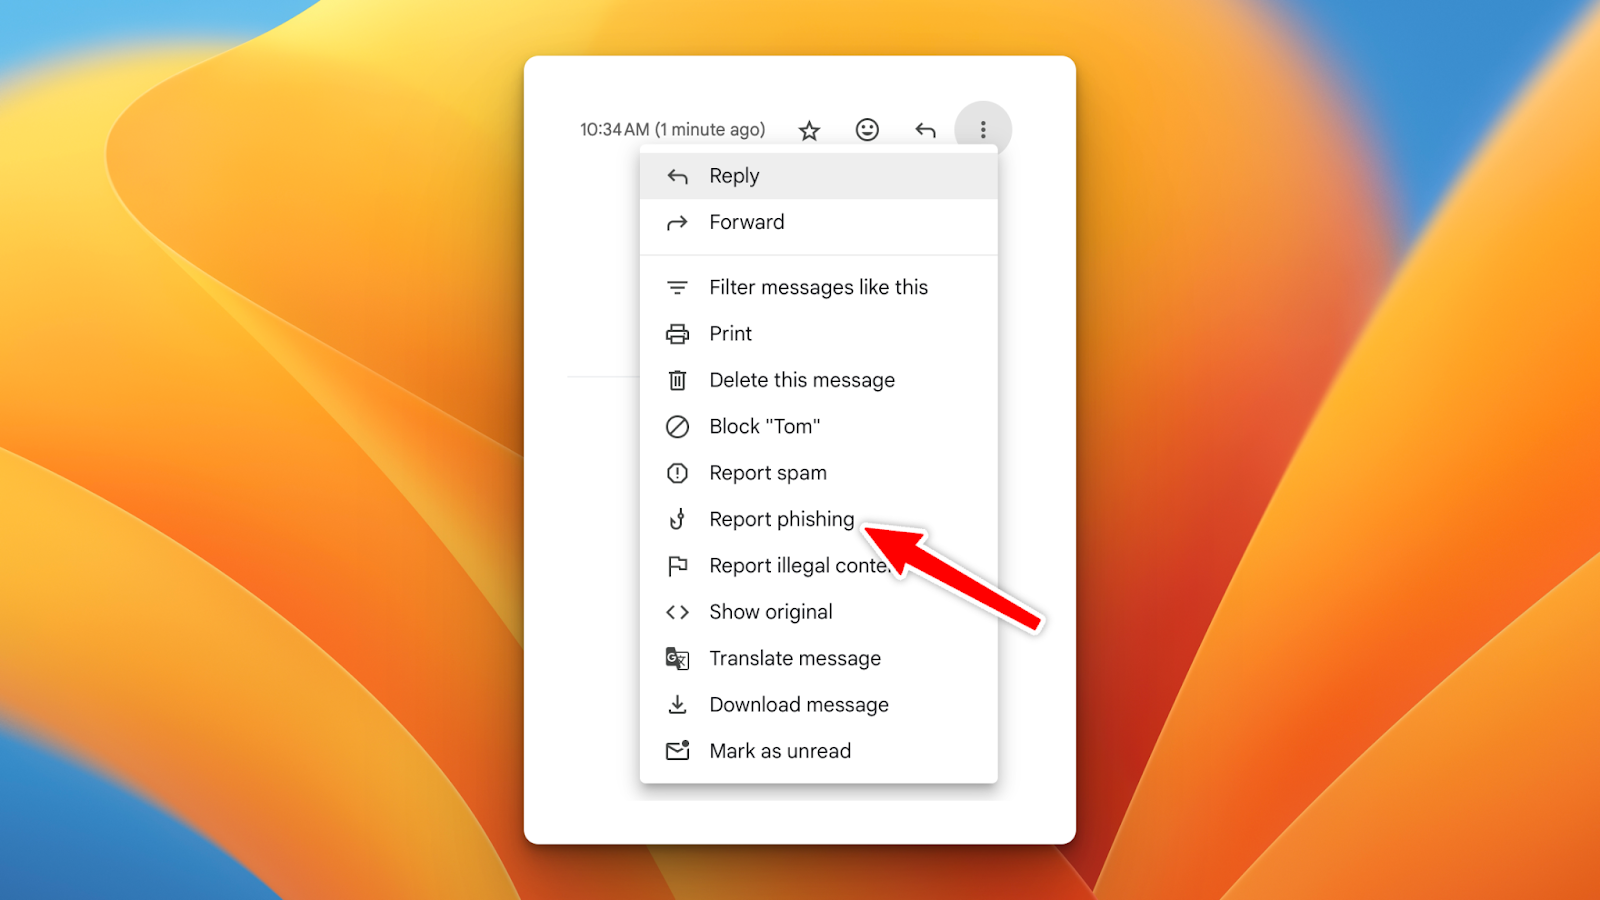
Why Do This?: Reporting helps Gmail improve its filters and protects other users too.
Managing Filters and Blocked Addresses
- Access Settings:
- Click the gear icon (⚙️) in the top-right corner and select “See all settings”.
- Go to Filters and Blocked Addresses:
- Click the “Filters and Blocked Addresses” tab.
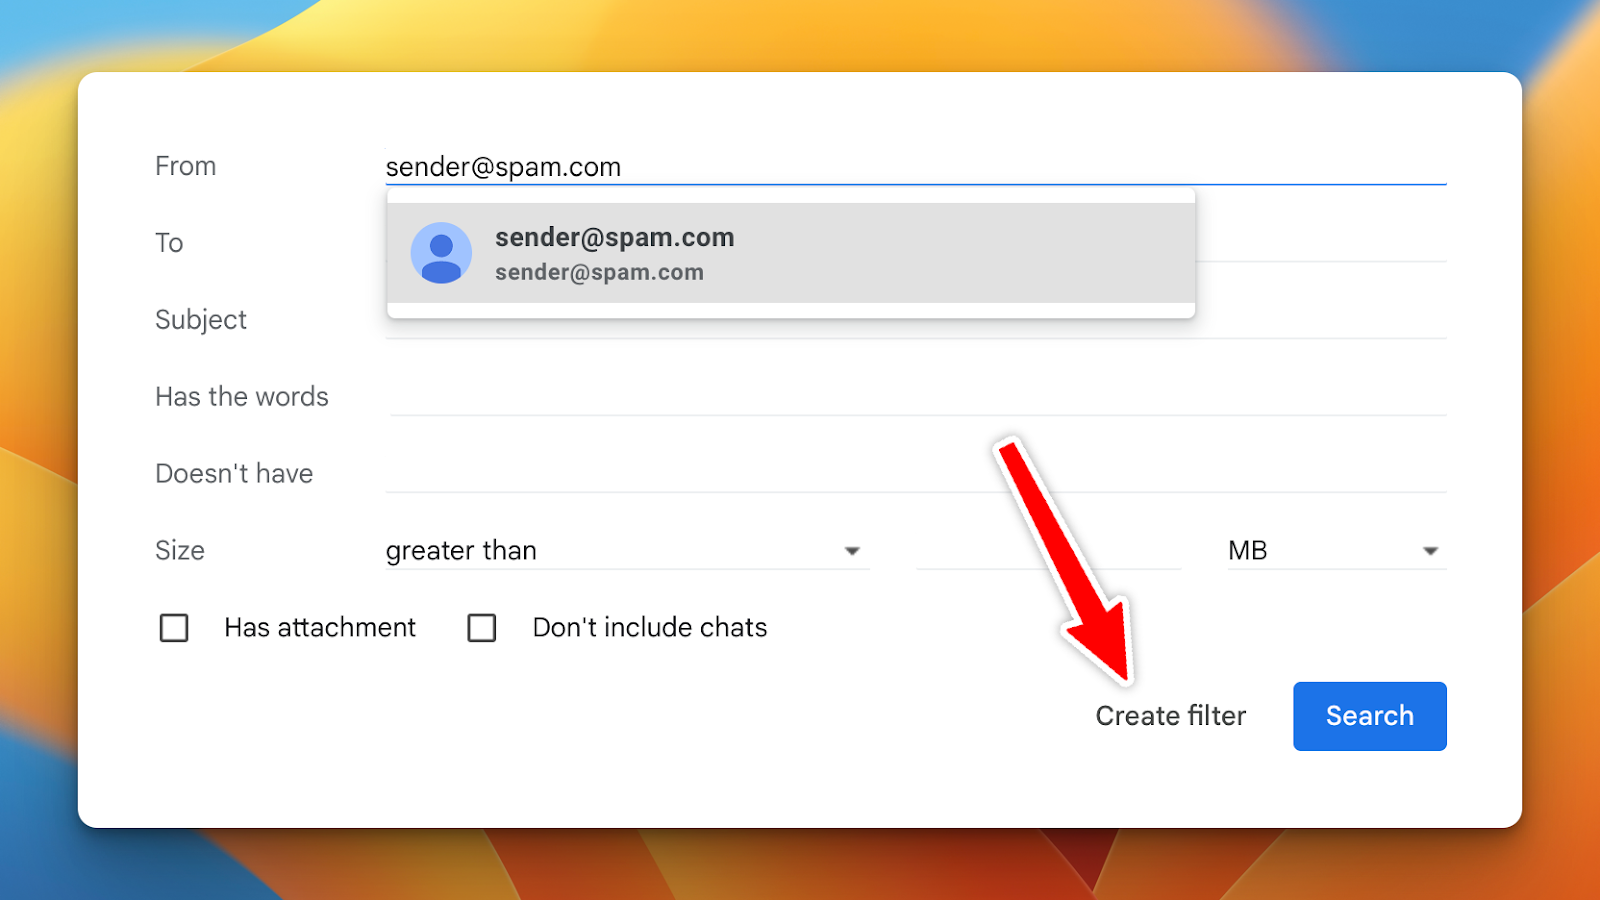
- Create a New Filter:
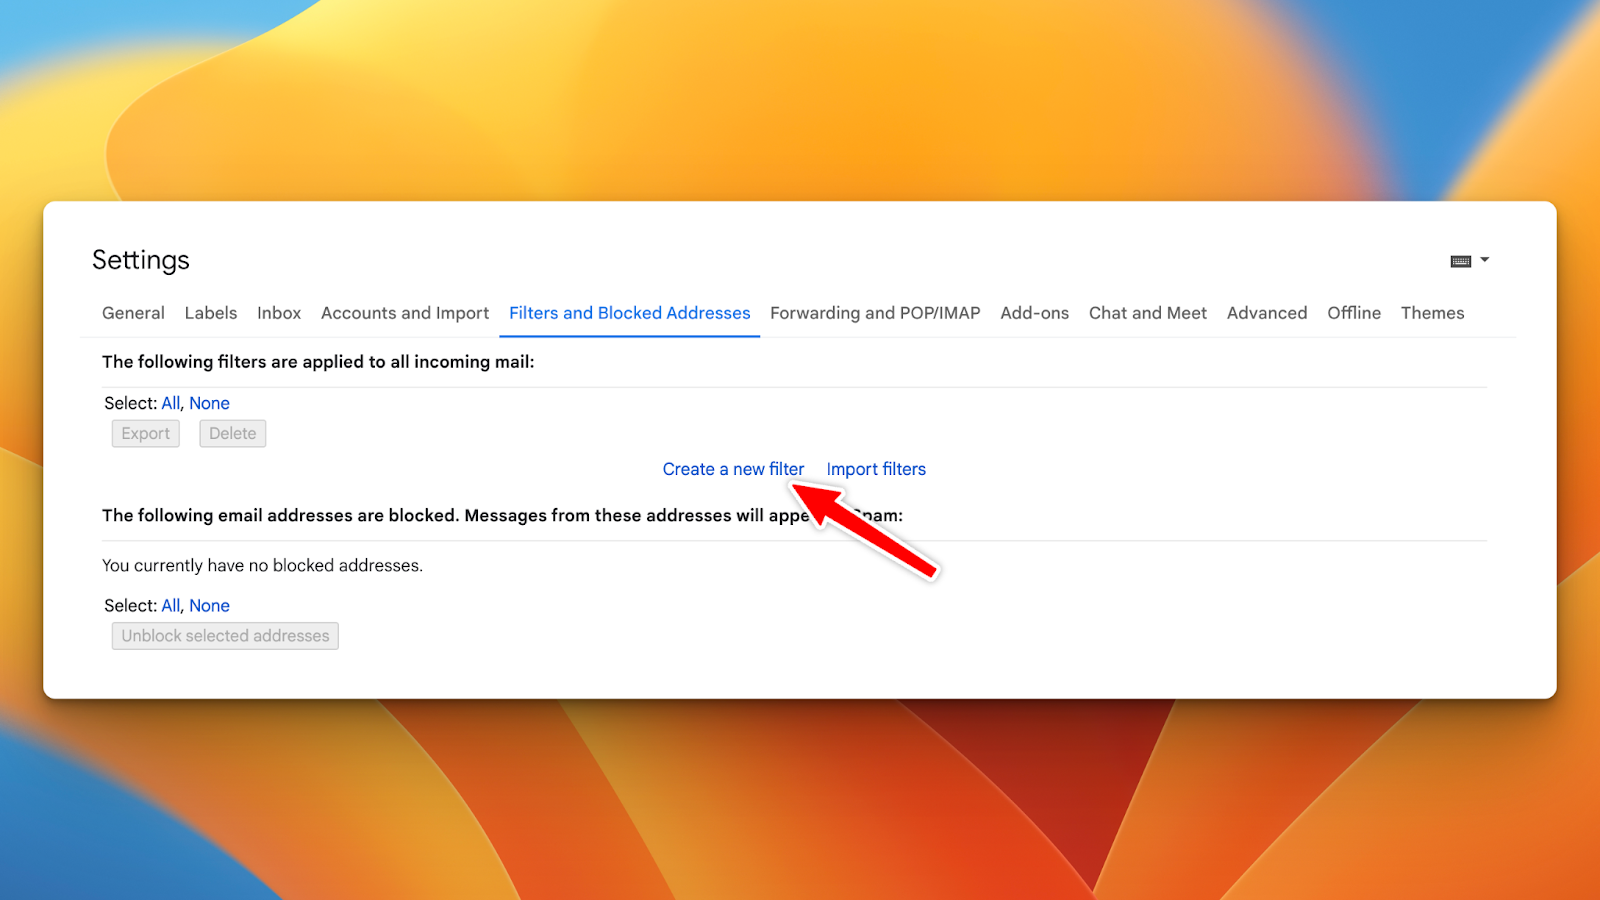
- Click “Create a new filter”.
- Enter the sender’s email address or specific keywords.
- Click “Create filter”.
- Choose an Action:
- Select “Delete it”, “Mark as spam”, or another action.
- Click “Create filter” to save.
Why Use Filters: They automate how you handle unwanted emails based on rules you set.
Tips for Better Email Management in Gmail
- Unsubscribe from Newsletters: Use Gmail’s unsubscribe link at the top of promotional emails.
- Use Priority Inbox: Turn on Priority Inbox to automatically sort important emails.
- Adjust Spam Settings: Regularly check and tweak your spam settings for the best results.
How to Block Unwanted Emails on Outlook
Microsoft Outlook has several features to help you block unwanted emails effectively.
Blocking a Sender in Outlook
- Open Outlook: Log in to your Outlook account.
- Right-Click the Email: Find the unwanted email and right-click on it.
- Select Junk Options:
- Hover over “Junk”.
- Click on “Block Sender”.
What Happens Next: Emails from this sender will be moved to the Junk Email folder.
Using the Junk Email Filter
- Access Junk Email Options:
- Click on the “Home” tab.
- Select “Junk”, then “Junk E-mail Options”.
- Choose Protection Level:
- Pick the level you want: Low, High, or Safe Lists Only.
- Set Your Preferences:
- Adjust settings for automatic deletion or warnings.
Keep in Mind: A higher protection level might accidentally filter out emails you want.
Managing Safe and Blocked Senders List
- Open Junk Email Options:
- Go to “Junk E-mail Options” as described above.
- Blocked Senders Tab:
- Click on “Blocked Senders”.
- Add email addresses or domains you want to block.
- Safe Senders Tab:
- Add trusted contacts to make sure their emails always reach you.
Tip: Update these lists regularly to keep your email filtering effective.
Tips for Better Email Management in Outlook
- Use Rules: Create rules to automate how incoming emails are handled based on conditions you set.
- Clean Up Conversations: Use Outlook’s “Clean Up” feature to remove duplicate messages.
- Archive Old Emails: Keep your inbox tidy by archiving emails you don’t need right away.
Blocking Unwanted Emails on Other Email Platforms
Yahoo Mail
- Block a Sender:
- Open the email.
- Click on the three dots (⋯).
- Select “Block senders”.
- Confirm and choose to delete existing emails if you want.
Apple Mail (iCloud)
- Set Up a Rule:
- Go to iCloud settings.
- Navigate to “Rules”.
- Create a new rule to move emails from specific senders to Trash.
ProtonMail
- Use Spam Filters:
- Go to “Settings”.
- Click on “Filters”.
- Add addresses or domains you want to block.
Remember: Each platform has its own features, so check their help resources for more details.
Advanced Strategies for Managing Unwanted Emails
Beyond basic blocking, try these strategies to keep unwanted emails away.
Unsubscribe from Unwanted Newsletters
- Find Unsubscribe Links: Usually located at the bottom of the email.
- Use Unsubscribe Features:
- Gmail might show an “Unsubscribe” link next to the sender’s address.
- Click it to stop future emails.
Be Careful: Only unsubscribe from sources you trust to avoid confirming your email to spammers.
Use Email Filtering and Rules
- Set Up Filters: Automatically send emails with certain keywords or from specific domains to junk or trash folders.
- Organize with Categories: Use categories or labels to sort your emails for easier management.
Consider Third-Party Tools and Services
Some third-party solutions can offer extra features for managing your emails.
Introducing Dismiss: Your Solution to Block Unwanted Cold Emails and Newsletters
Handling unwanted emails can be time-consuming and overwhelming. Dismiss is a powerful tool designed to help you block unwanted cold emails and newsletters, making inbox management a breeze.
How Dismiss Helps You Manage Your Inbox
- Automatic Filtering: Dismiss smartly identifies and filters out unwanted emails before they reach you.
- Easy Setup: Integrates smoothly with your existing email platforms without complicated steps.
- Customizable Controls: Lets you adjust settings to fit your needs, so you don’t miss important emails.
Features and Benefits of Dismiss
- Better Spam Protection: Catches tricky cold emails and newsletters that standard filters might miss.
- Saves You Time: Cuts down on the need to manually sort through junk emails.
- Privacy and Security: Handles your emails securely, keeping your information private.
Practical Examples of Dismiss in Action
- Busy Professionals: Keep your work inbox free from distractions to stay focused.
- Students: Don’t miss important school emails buried under unwanted messages.
- Entrepreneurs: Manage communications efficiently, staying connected with clients and partners.
Take Control of Your Inbox Today
Ready for a cleaner, more organized inbox? Visit Dismiss to learn more and sign up. Dismiss makes it easy to reclaim your inbox from unwanted emails.
Best Practices for Keeping Your Inbox Clean
Along with the tools and strategies we’ve discussed, try these best practices:
- Protect Your Email Address: Avoid posting your email publicly or giving it out to untrustworthy sites.
- Use Disposable Emails: For one-time sign-ups or downloads, consider using a temporary email address.
- Review Subscriptions Regularly: Periodically check and unsubscribe from newsletters you don’t read anymore.
- Stay Informed About Scams: Learn about common phishing tactics to keep yourself safe.
Conclusion
Unwanted emails don’t have to take over your inbox. By using the features of Gmail, Outlook, and other email platforms, along with strategies and tools like Dismiss, you can effectively block unwanted emails and improve your email experience.
Take the first step toward a cleaner inbox—try out these tips today and consider adding Dismiss to your email routine. Visit Dismiss to see how easily you can handle unwanted emails.
Equip yourself with the knowledge and tools to keep your inbox organized, secure, and free from unwanted distractions.